Showing posts with label Programing. Show all posts

Saturday, 5 November 2022

Android - Replace OnLifecycleEvent is deprecated with DefaultLifecycleObserver or LifecycleEventObserver

As of androidx.lifecycle version 2.4.0, OnLifecycleEvent is deprecated. Instead Use DefaultLifecycleObserver or LifecycleEventObserver is recommended to use instead. Many android applications that use OnLifecycleEvent such as when integrating Admob Open Ads will receive a warning.


For example, the following code will be warned by Android Studio OnLifecycleEvent is deprecated:


    /**
     * LifecycleObserver methods
     */
    @OnLifecycleEvent(ON_START)
    public void onStart() {
        showAdIfAvailable();
        Log.d(LOG_TAG, "onStart");
    }
To replace OnLifecycleEvent, follow these instructions:

First: In build.gradle, please include the LifecycleObserver libraries:


apply plugin: 'com.android.application'

dependencies {
   ...

   implementation "androidx.lifecycle:lifecycle-extensions:2.2.0"
   implementation "androidx.lifecycle:lifecycle-runtime:2.5.1"
   annotationProcessor "androidx.lifecycle:lifecycle-compiler:2.2.0"
}

Then choose one of the following two alternatives:

Method 1: replace OnLifecycleEvent with DefaultLifecycleObserver


...
import androidx.lifecycle.DefaultLifecycleObserver;

public class MyApplication extends Application implements DefaultLifecycleObserver {
    @Override
    public void onCreate() {
        super.onCreate();
	// Register DefaultLifecycleObserver 
	ProcessLifecycleOwner.get().getLifecycle().addObserver(this);
    }

    /*Replace for OnLifecycleEvent onStart Event */
    @Override
    public void onStart(@NonNull LifecycleOwner owner) {
	// Perform actions every time the app is reopened
    }
}

Method 2: replace OnLifecycleEvent with LifecycleEventObserver


public class MyApplication extends Application implements LifecycleObserver
{
  @Override
  public void onCreate() {
    super.onCreate();
    //...
    // Register LifecycleObserver
    ProcessLifecycleOwner.get().getLifecycle().addObserver(this);
    //...
  }

  /*Replace for OnLifecycleEvent onStart Event */
  @OnLifecycleEvent(Event.ON_START)
  protected void onMoveToForeground() {
    // Perform actions every time the app is reopened (moves to foreground)
    // appOpenAdManager.showAdIfAvailable(currentActivity);
  }
}

Done !

If you have any difficulties, or have any questions, please leave a comment below the article. We will deal with them together. Thanks


Sunday, 21 August 2022

[Flutter] Async Function vs Normal Function in Dart, How do they work?

 "Synchronous", "asynchronous", "await" and "asynchronous functions" are very confusing concepts when used in Flutter. For ease of explanation, in this article we will analyze two types of Flutter functions: Normal Function and Async Function. We will learn how these two types of functions work.
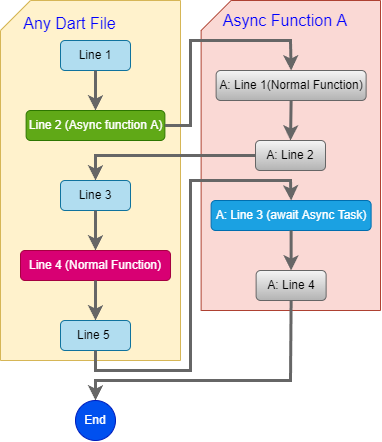
Ficture 1: Flutter/Dart async work flow

Normal Function and Async Function

The Dart language that Flutter uses inherits many features from Javascript. Dart's handling of synchronous and asynchronous jobs is also very similar to Javascript. There are two types of functions in the Dart language:

* Normal Function:

A function in Dart is declared as follows:


String doSomthing(){
    print('This is a normal Function');
    // do somthing
    return 'Done!';
}

* Async Function:

Async functions are functions declared with the async keyword at the end. 


String getApiContent() async{
    print('Async function loading api from Server');
    final response = await http.get(Uri.parse('https://codesiri.com/search/?q=api'));
    return response.body;
}
The difference of Async functions from normal functions is that in an Async function you will be able to use the await keyword to wait for another function to finish executing. Also, an Async doesn't return an immediate result, it just returns a Future.

Dart is an asynchronous language

By default, Dart always tries to process everything asynchronously whether it is an async function or a normal function. Let's analyze the example depicted in Figure 1.

Like other programming languages, DArt will also process the source code line by line from top to bottom. Even when encountering an Async function it continues to deal with the same logic. That's why in the example we see line 1 and line 2 in asyn function callApi still being executed. "Async" appears only when an actual async event occurs (http.get).

Inside an Async function when encountering a "real" async event (a predefined async event by Dart, not a self-created async function) there are 2 options.

Case 1: you can use the await keyword to wait until the async event completes and return the result. The current async function will break at that location. You did not read it wrong, Exactly, the async function will be interrupted at that point, not a new thread or process is initialized to run in the background at this time to continue the async task we are expecting. (You can use additional tools like Charles to verify this.) Of course Dart has kept in mind that there is an Async event still pending. Next Dart will return to the main program to continue to execute the next lines of code. That's why we see the sleep function being executed immediately followed by lines 3, 4, 5 being executed. After the main program has completed, Dart returns to continue processing asynchronous events and the next line of code in the async function.

Case 2: if you don't use await keyword before async event. Just like the case of 1 Dart will remember the pending asynchronous event, but next Dart will continue to execute the next code in the current async function as if nothing happened.


import 'package:http/http.dart' as http;
import 'dart:io';

void main(){	
  print('Line 1 - done !');
  var apiResult = callApi();
  sleep(Duration(seconds: 15)); // Test to monitor async task
  print('Line 3 - done !');
  normalFunction();
  print('Line 5 - done !');
}

Future callApi() async{
  print('Line 2 - Async Function callApi called');
  normalFunction2();
  print('==>A: Line 2 - Line 2 function callApi');
  final response = await http.get(Uri.parse('https://codesiri.com/search/?q=api'));
  print('==>A: Line 3 - call api done !');
  print('==>A: Line 4 - done !');
  return 'Done !';
}

void normalFunction1(){
  print('Line 4 - This is normalFunction1');
}
void normalFunction2(){
  print('==>A: Line 1 - This is normalFunction2');
}

Result:


I/flutter (21546): Line 1 - done !
I/flutter (21546): Line 2 - Async Function callApi called
I/flutter (21546): ==>A: Line 1 - This is normalFunction2
I/flutter (21546): ==>A: Line 2 - Line 2 function callApi
I/flutter (21546): Line 3 - done !
I/flutter (21546): Line 4 - This is normalFunction1
I/flutter (21546): Line 5 - done !
I/flutter (21546): ==>A: Line 3 - call api done !
I/flutter (21546): ==>A: Line 4 - done !

Dart is a single-threaded programming language

The reason Dart has to handle such complex asynchronous events is because it was designed to be a single-threaded language. By default our entire Flutter application runs on a single Dart thread. You will also still be able to create additional threads to actively handle parallel or background tasks, but then you will have to deal with the problems that arise.

Summary

When it encounters an async event, Dart will always push it to the bottom to wait for it to be processed. If there is await before the async call, all code that follows will also be pushed to the bottom to wait with it. Otherwise the next lines of code will still be treated as if nothing happened. Understanding how Dart's async works will help you optimize your application.

Friday, 29 July 2022

[Flutter] Fix install error "cmdline-tools component is missing" and "Android license status"

Flutter on windows

Command line tools are very useful during android app development with Flutter. In some cases you may have difficulty installing it due to version incompatibility or conflicts with other software. After installing cmdline-tools you can continue to confirm the Android license.

Sample Flutter doctor analytic info:

C:\Users>flutter doctor
Doctor summary (to see all details, run flutter doctor -v):
[√] Flutter (Channel stable, 3.0.5, on Microsoft Windows [Version 10.0.19043.1826], locale en-US)
[!] Android toolchain - develop for Android devices (Android SDK version 33.0.0)
    X cmdline-tools component is missing
      Run `path/to/sdkmanager --install "cmdline-tools;latest"`
      See https://developer.android.com/studio/command-line for more details.
    X Android license status unknown.
      Run `flutter doctor --android-licenses` to accept the SDK licenses.
      See https://flutter.dev/docs/get-started/install/windows#android-setup for more details.
[√] Chrome - develop for the web
[X] Visual Studio - develop for Windows
    X Visual Studio not installed; this is necessary for Windows development.
      Download at https://visualstudio.microsoft.com/downloads/.
      Please install the "Desktop development with C++" workload, including all of its default components
[√] Android Studio (version 2021.2)
[√] VS Code (version 1.69.2)
[√] Connected device (3 available)
[√] HTTP Host Availability
! Doctor found issues in 2 categories.

As suggested, you just need to run the command: Run `path/to/sdkmanager --install "cmdline-tools;latest"`. But there might be an error: Exception in thread "main" java.lang.NoClassDefFoundError: javax/xml/bind/annotation/XmlSchema. In this case we can fix it by installing cmdline-tools through Android Studio. This method is always applicable and very easy to do.

Step 1: In the Android Studio software, you click on the menu Tools >> SDK Manager

Step 2: In the SDK Manager setting screen, select the "SDK Tools" tab. Then tick "Android SDK Command-line Tools (lastest)". Finally click "Apply" to start the installation.

Step 3: After installing "Command-line Tools" you can open a command line window to continue to confirm "Android licenses"

flutter doctor --android-licenses

Done ! Check Flutter doctor to make sure everything is fully installed. Good luck.


Friday, 20 August 2021

[Tips] How to use Cloudflare Free SSL for Socket.io Server

Free SSL is a very interesting feature of Cloudflare. Cloudflare SSL has full support for WebSocket protocol. However, if you are using the web in conjunction with a socket.io server on the same server, you may encounter problems with the ssl port. Because the default port for ssl is always 443 but it is already used by the web server.

There are many ways to handle this problem, here I will guide you in a very simple way. That's how to configure Socket.io SSL through a proxy using Apache or Nginx.


Prepare:

NodeJs SocketIO server is listen on port 8088

Webserver (Apache or Nginx) is listen on port 80 and 443

Step 1: SocketServer config

Configure NodeJs SocketIO server to run in long polling mode without ssl on a certain port, eg port 8088.

Eg:

var app = require('express')(); //npm install express
var http = require('http').createServer(app);
var socketServer = require('socket.io')(http, { //npm install socketio
cors: {
origin: "*",
methods: ["GET", "POST"]
},
  transports: ['polling']
});
http.listen(8088, () => {
console.log('listening on port 8088');
});

Configure socket.io client to use 'polling' mode

Eg:

var socket = io('https://subdomain.yourdomain.com', { });
socket.on('connect', function () {
console.log('connected');
});

Step 2: Configure virtualhost proxy for Socket Server

Configure virtual host proxy to forward port 80 from cloudflare to the actual port of our Socket Server (I listen on port 80 because I am using Cloudflare flexible ssl, if you use Cloudflare full ssl or full strict ssl then listen on port 443 like your other virtualhost)

Apache:

<VirtualHost *:80>
    ServerAdmin admin@yourdomain.com
    ProxyPreserveHost On
    ServerName subdomain.yourdomain.com
    ProxyPass / http://127.0.0.1:8088/
    ProxyPassReverse / http://127.0.0.1:8088/
</VirtualHost>

Nginx:

server {
    listen 80;
    server_name subdomain.yourdomain.com;
    location / {
        proxy_set_header   X-Forwarded-For $remote_addr;
        proxy_set_header   Host $http_host;
        proxy_pass         http://127.0.0.1:8088;
    }
}

Done !

Remember to reload your web server 

Now your NodeJs Socket Server is working perfectly with free ssl from CLoudflare


Tuesday, 6 October 2020

Laravel: Force to use HTTPS for all routes and url (Support Cloudflare Flexible SSL)

Laravel - In some special cases but especially when you are using Cloudflare Flexible SSL. We need a solution so that all URL on our website (created by url, route function) must be https even though our server currently doesn't support ssl.

Solution:

Edit App\Providers\AppServiceProvider.php in the boot() method

public function boot()
{
       
// custom for cloudflase flexible ssl
        if($this->checkHTTPSStatus()){
            URL::forceScheme('https');
        }
/*...some other code...*/
}
private function checkHTTPSStatus()
{
/*Select code in an option below*/
}

Option 1: Switch to https according to the configuration in the env file

private function checkHTTPSStatus()
{
return env('APP_HTTPS',false) === true;
}

In .env file you must to declare APP_HTTPS parameter

APP_HTTPS=true

Option 2: Automatically switch to https if the user comes from Cloudflare Flexible SSL

private function checkHTTPSStatus()
{
return (isset($_SERVER['HTTP_X_FORWARDED_PROTO'])&&$_SERVER['HTTP_X_FORWARDED_PROTO']==='https');
}

Option 3: Full SSL

private function checkHTTPSStatus()
{
return !empty($_SERVER['HTTPS']);
}

Solved !

Monday, 10 August 2020

Laravel Error "$errors is undefined"

Case: In a Laravel project, when you try to get the form validation error object but it fail. 
    $errors is undefined

Reason: Laravel passes the errors variable from the controller to the view file via session. The $errors variable is bound to the view by the Illuminate\View\Middleware\ShareErrorsFromSession middleware, which is provided by the web middleware group. So when you do not declare the web middleware group (containing middleware \Illuminate\View\Middleware\ShareErrorsFromSession) for your route, you will get the error as seen.

Solution: Check your route to make sure you added ShareErrorsFromSession Middleware


Solved !


Sunday, 26 July 2020

Laravel Fix Error : Function name must be a string by Illuminate\Pipeline\Pipeline.php


Laravel

Issue: Laravel encountered error "Function name should be a string" or "Function name must be a string" in Api or somewhere. Error reported from file "Illuminate\Pipeline\Pipeline.php"
$carry = method_exists($pipe, $this->method)
                                    ? $pipe->{$this->method}(...$parameters)
                                    : $pipe(...$parameters);
Reason: You have used some middleware by name that has not been previously declared.
Debug: Check all middleware used, make sure it is already declared in the file Kernel.php. The most common scenario is that you have not declared 'auth' middleware yet.

protected $routeMiddleware = [
        'auth' => \Illuminate\Auth\Middleware\Authenticate::class,
        ...
}
Done ! 

Tuesday, 7 July 2020

Fix Laravel Error - Please provide a valid cache path


Error when install new Laravel project in server.

InvalidArgumentException
Please provide a valid cache path.

This error can be caused by

…/vendor/laravel/framework/src/Illuminate/View/Compilers/Compiler.php line 36

* Reason: 
To increase performance, the default laravel will need to be configured in a directory to store the cache files of views, sessions ...., so you need a cache directory in your project. Normally this directory will be created automatically, but in some situations such as the user who does not have much experience in the installation of the project git, this cache directory may be lost or incorrect.

* Solve:
Declare the cache directory for Laravel and make sure php needs write permissions in that directory

- create 4 folder for cache:

.../bootstrap/cache
.../storage/framework
.../storage/framework/views
.../storage/framework/cache
.../storage/framework/sessions
(... is the path to your project folder)

- grant write permissions to these directories (777 is not a good choice for security)

chmod 777 .../bootstrap/cache -R
chmod 777 .../storage/framework -R

- To keep these directories empty in the git project, you can add a .gitignore file to those directories with the content:

*
!.gitignore

- If your server is using selinux remember to give write permission to php

sudo chcon -t httpd_sys_rw_content_t .../bootstrap/cache -R
sudo chcon -t httpd_sys_rw_content_t .../storage/framework -R
Done !

Monday, 22 June 2020

[PHP] Laravel Exception: Malformed UTF-8 characters, possibly incorrectly encoded

This error can be caused from many laravel modules such as Datatables, Json Output, Monolog ... So this is a very difficult error to analyze and fix. In this article we try to find some way to fix that bug in laravel (in the common cases).
Why did you get this error? and how to fix it?

* Case 1: In case of failure due to wrong configuration of database connection
The most common is when you connect to a second database. Developers often have a configuration that lacks the "charset" and "collation" parameters, causing the error as you see it:
Exception Message:↵↵Malformed UTF-8 characters, possibly incorrectly encoded
To fix it please configure the connection parameters are complete.
Eg:

'mysql' => array(
            'driver'    => 'mysql',
            'host'      => 'localhost',
            'database'  => 'database_name_1',
            'username'  => 'user_1',
            'password'  => 'password_1'
            'charset'   => 'utf8',
            'collation' => 'utf8_unicode_ci',

            'prefix'    => '',
    ....
 ),
/*mysql2 if you use two database*/
'mysql2' => array(
            'driver'    => 'mysql',
            'host'      => 'hostForDB2',
            'database'  => 'database_name_2',
            'username'  => 'user_2',
            'password'  => 'password_2'
            'charset'   => 'utf8',
            'collation' => 'utf8_unicode_ci',

            'prefix'    => '',
    ...
),

* Case 2: Regex Error - Caused by some regex function in route, url validate ....
PREG_BAD_UTF8_ERROR 'Malformed UTF-8 characters, possibly incorrectly encoded'

*Case 3: JSON Encode, Json output error - Caused by Monolog, Datatables Logs..

To Fix Case 2 & 3 you can try converting the input to utf-8, or remove non-utf-8 characters.

Eg1: Function to auto convert any string to utf-8 encoding

$newString = mb_convert_encoding($inputString, "UTF-8", "auto");

Eg2: fix utf-8 encoding for Datatables column

$datatable->editColumn('title', function(Post $node) {
            return mb_convert_encoding($node->title,"UTF-8", "auto");
        });
Done ! For any other questions you can leave them in the comment section at the end of this article. Thank you.

Thursday, 7 May 2020

Composer: How to fix error "Fork failed errors" in Linux server


In many cases we encounter lack of memory errors when running "composer install" or "composer update" command to update packages in our PHP project.
Some of the error messages you may receive:

  • - proc_open(): fork failed errors - Cannot allocate memory
  • - exception is caused by a lack of memory
  • - Killed

The cause of all these errors is because our server does not have enough RAM to allocate to Composer. Increasing packages in the project, the larger the size, so this error is also becoming more and more common. To fix them you can increase the server's physical RAM but the cost will be quite expensive.

There is another solution simpler and completely free to fix Composer memory error. That is we can enable swap space for the server. This is quite easy to implement and will thoroughly fix the error we encounter. For each operating system, there will be different ways to initialize swap partitions. You can refer to one of the instructions below:

Enable Swap to fix Composer memory error for Centos, Ubuntu ...:

Step 1: Create a new Swap file (1GB to 3Gb)
sudo fallocate -l 3G /swapfile
Step 2: Add Write permission for Swap file
sudo chmod 600 /swapfile
* If your server is running under SELinux, after chmod command you must run the following command
sudo chcon -t swapfile_t /swapfile 
Step 3: set up a Linux swap area
sudo mkswap /swapfile
Step 4: Active Swap for server
sudo swapon /swapfile
opening the "/etc/fstab" file
vi /etc/fstab
then add the following line at end of file.
/swapfile swap swap defaults 0 0

Done ! If there are no errors, you have successfully enabled the swap for your server. You can try checking the swap partition with one of the following commands:
sudo swapon --show
or
top
or
sudo free -h

Now it's time to try running the composer commands again. Hopefully the bug has been fixed. Good luck.

*Note:
- /swapfile  - is file name for swap file, you can use another name or put it in another folder.
- In addition to using swap files, you can also try to use swap partitions.
- Some problems with PHP modules can also cause errors because Composer runs on PHP

*Refer: https://getcomposer.org/doc/articles/troubleshooting.md

Wednesday, 11 November 2015

Yii2: Get raw SQL Query from an Activerecord or a query builder

This tutorial show you how to dump the Sql Query from an Activerecord and more.
It can help us to debug Sql query in some case when yii debug is not work.

Example:
$listBooks = Books::find()->where('author=2')->all();

To get raw SQL query with all parameters included try:
$query = Books::find()->where('author=2');
echo $query->createCommand()->sql;
echo $query->createCommand()->getRawSql();

It not only works with Activerecord .
Refer : http://chris-backhouse.com/Yii2-Output-the-SQL-from-a-query-builder/1027

Monday, 22 June 2015

Yii2: Unknown Property Exception after adding column to table

Unknown Property – yii\base\UnknownPropertyException
Getting unknown property: app\models

What happens when you get an error Exception "Getting unknown property", after just added a field to the table in the database ?
  1. Check your property name, was it correct?
  2. Clear cache if you using cache. Yii2 will cache the table schema so if you change the table you need to clear the cache

Wednesday, 18 September 2013

PHP: how to get current page url (Windows/IIS + Linux)

In many times we need to get current page url using PHP. But there are some different system parameters between Linux and Windows so that some function can be good in linux server but cannot run on Windows example Xampp on windows. The following solutions can solve the problem.

function getURL()
    {
        $pageURL = 'http';
        if (!empty($_SERVER['HTTPS']) && $_SERVER['HTTPS'] != 'off') { // SSL connection
            $pageURL .= 's';
        }
        $pageURL .= "://";
        if ($_SERVER["SERVER_PORT"] != "80") {
            $pageURL .= $_SERVER["SERVER_NAME"] . ":" . $_SERVER["SERVER_PORT"] . $_SERVER["REQUEST_URI"];
        } else {
            $pageURL .= $_SERVER["SERVER_NAME"] . $_SERVER["REQUEST_URI"];
        }
        return $pageURL;
    }

You also can custom it to get other system parameters base on $_SEVER variable.
learn more : PHP $_SERVER manual.

Thursday, 12 September 2013

PHP: Convert string to float or get float number from string

(float) function that is the fastest way and the fastest performance to convert a string to a float number.
For example :

echo (float) '154.256';                     // output 154.256
echo (float) '154.256dsgaddgvgf';    // output 154.256
echo (float) '154.256fsadfdsfa15';   // output 154.256
echo (float) 'fsdfdsafd154.256';       // output 0

* if you want to get a float from all numeric characters in string you can try following functions :

function getFloatFromString($string) {
     return (float) preg_replace('/[^0-9.]/', '', $string);
}

example :

echo getFloatFromString('abcdef152.685');       // output 152.685
echo getFloatFromString('abcdef152.6cs85');    // output 152.685
echo getFloatFromString('abcdef152.685fd');    // output 152.685

Sunday, 8 September 2013

PHP: how to clear echo buffer

Sometimes we need to clear all previously output such as : echoed text, printed, buffer ....
"ob_get_clean()" is solution.

<?php
//ob_start(); // This function must be put at top of file. It will turn output buffering on, but not important because default is on
?>
Demo output !
<?php
echo "Hello World";
ob_get_clean();
?>